Wednesday 29 February 2012

Cinnamon Rolls


I endeavour to bake something every week, partly because it saves us having to buy sweet snacks, and partly because it provides a productive distraction from studying. Simon requested Danish Pastries (which I call Cinnamon Rolls, probably because I read too many Amish novels) but it took me a while to get around to making them as I was cautious of using yeast. Thankfully I found this wonderful recipe, which omits yeast entirely but still works out perfectly. I didn't change anything about this recipe, except the frosting, so credit is owed entirely to MomsWhoThink.com.

Cinnamon Rolls
The margarine is featured as I was worried I
wouldn't have enough butter

Makes: 6 - 8
Preparation Time: 20 - 30 minutes
Cook Time: 20 - 25 minutes

Ingredients for Rolls
2 1/2 cups (320g) of plain (all-purpose) flour 
2 tablespoons of white (granulated) sugar
1 1/4 teaspoons of baking powder
1/2 teaspoon of baking (bicarbonate) soda
1/2 teaspoon of salt
1 1/4 cups (295ml) of buttermilk (the Dale Farm Lakeland Buttermilk contains the exact quantity needed for this recipe)
6 tablespoons of unsalted butter, melted

Directions

1. Preheat oven to 425 degrees F/220 degrees C/Gas 7. Grease a 9-inch cake tin.
2. In a large bowl, whisk together the flour, sugar, baking powder, baking soda and salt. 
3. In a separate bowl whisk the buttermilk and 2 tablespoons of melted butter together.
4. Stir the buttermilk mixture into the flour mixture with a wooden spoon until it is all absorbed, for about 30 seconds. The dough should look shaggy. (This description sounds weird but it makes perfect sense once you've made this).
5. Turn the dough out on to a generously floured counter or board and knead until smooth, for about 1 minute. 
6. Roll the dough out into a rectangle of 9 x 12 inches. 
7. Brush the dough with 2 tablespoons of melted butter.
8. Prepare the cinnamon filling.

Ingredients for Cinnamon Filling
3/4 cup (165g) of packed dark brown sugar
1/4 cup (50g) of white (granulated) sugar
3 teaspoons of ground cinnamon
1/8 teaspoon of salt
1 tablespoon of unsalted butter, melted

9. In a bowl, combine the brown sugar, white sugar, cinnamon and salt. Stir in the butter until the mixture resembles wet sand. (I'm not sure if mine entirely looked like wet sand, but it did the job.)


This is the mixture before I added the butter. Doesn't the reflection of my camera's flash off the inside of the metallic bowl make it look like there's a heart in the sugar mixture? I thought this was sweet. 


10. Sprinkle the filling evenly across the dough, leaving a 1/2-inch border. (Seriously, make sure you leave a border or a lot of the mixture falls out and makes a mess when you roll it up, so expect cinnamon and sugar all over your counter if you ignore this instruction, as I did...)
11. Starting at the long side, roll the dough, pressing lightly, to form a tight log. If you struggle to get the dough off the board/counter then use a metal spatula or bench scraper. 
12. Pinch the seam to seal then slice the dough into 8 even pieces. (Mine made 8 but 2 of them were really small, so figure out what works best for your dough, it may only be 6 or 7)

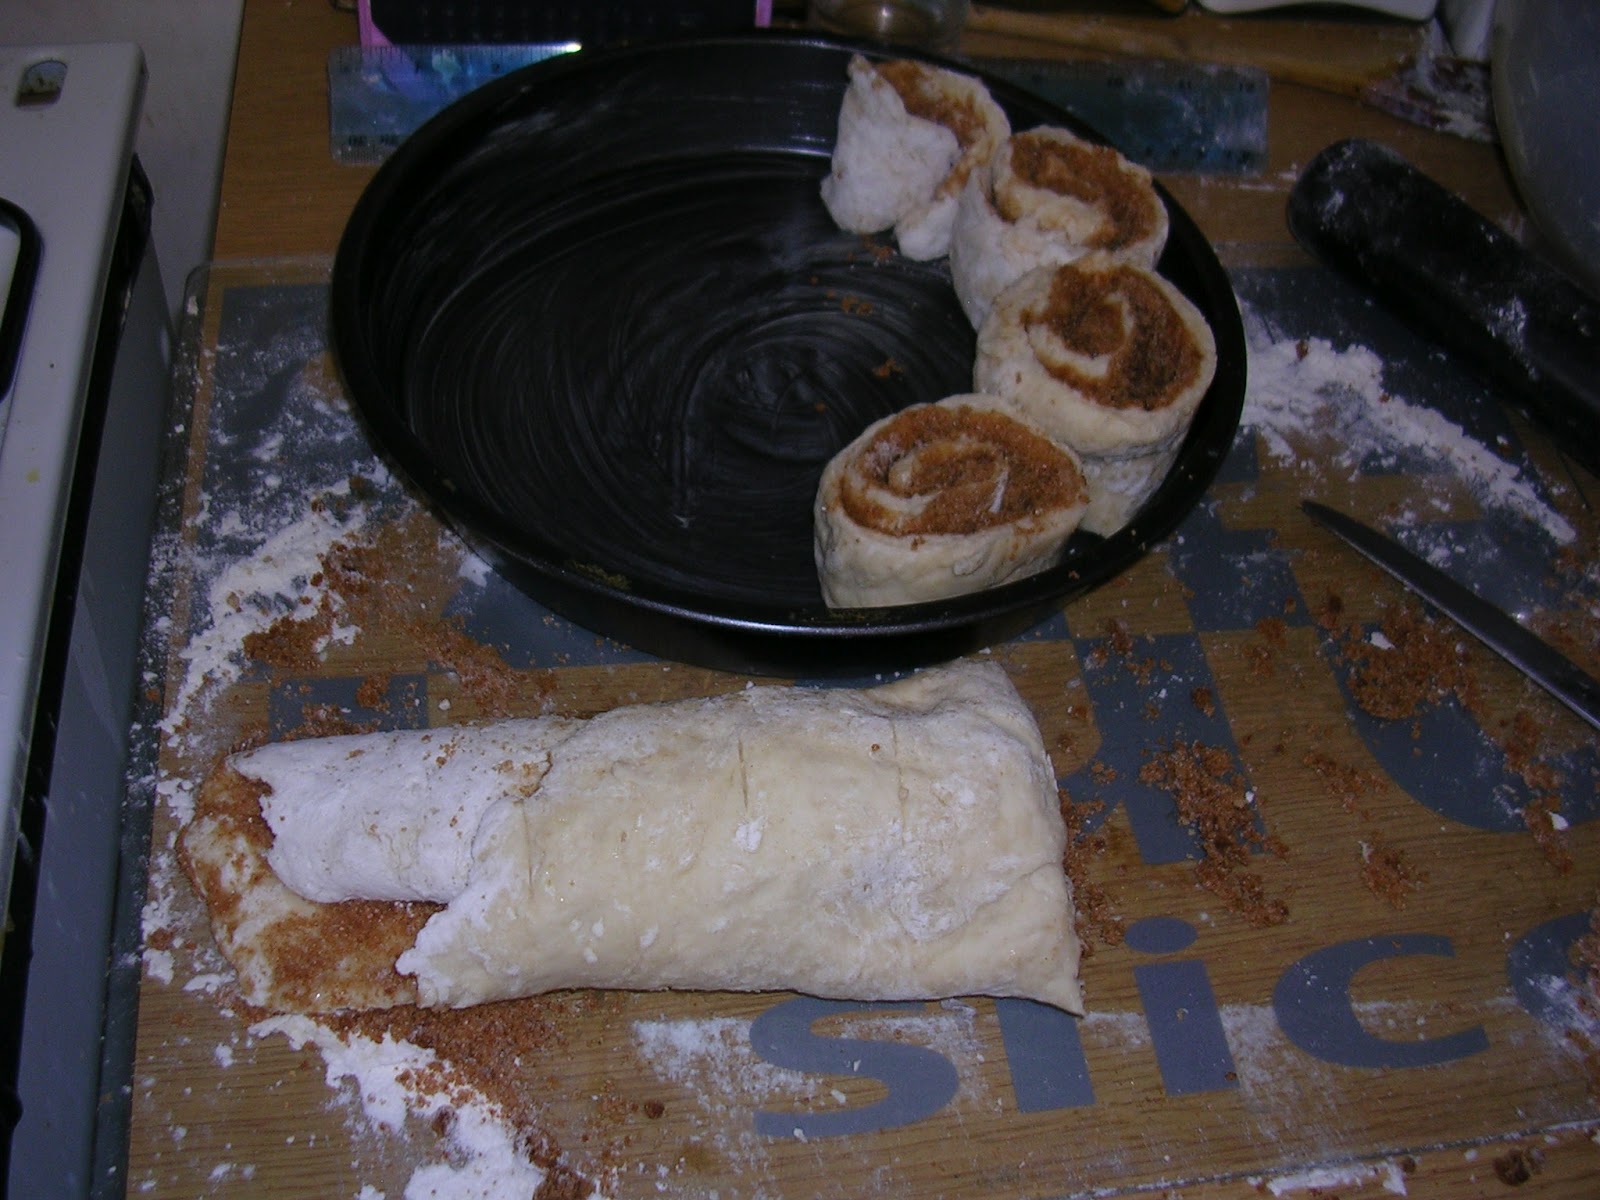
As you can see, my rectangle wasn't terribly even, hence the
very small rolls at either end of my log.


13. Place the slices in the greased pan and brush them with the remaining 2 tablespoons of butter. 


14. Bake until the edges are golden brown, which should take 20 - 25 minutes. 


15. Use a knife to loosen the rolls from the pan, and flip them on to a wire cooking rack. Turn the rolls the right way up and let them cool for 10 minutes before frosting them. 

The recipe I used recommended a cheese cream frosting, but I used a simple icing sugar frosting instead. Here's what I'd suggest, although you may want to check out the original recipe for their take on the frosting.

Ingredients for Frosting
1 cup (128g) of icing (confectioner's) sugar
1 tablespoon of milk or water

Directions
1. Sift sugar into a bowl.
2. Mix in milk or water until it forms a paste with the sugar.
3. Coat on top of cinnamon rolls with a knife or spoon. 
4. Wait for frosting to set and then EAT.


— Rachel 

Tuesday 28 February 2012

Slow Cooker Chicken Pot Pie


Either I was a deprived child, or chicken pot pie simply isn't popular in the UK. I'd heard of it several times in American novels, but up until I stumbled across this recipe on Stephanie O'Dea's blog, I hadn't been able to find a recipe that appealed to me. In fact, the first chicken pot pie recipe I found was in a Debbie Macomber novel and featured canned chicken, which did not appeal to me in the slightest.


I'm glad I wasn't put off by the ingredients in the original recipe as my version turned out really well. I've made it twice so far and it's definitely becoming a family favourite.


Slow Cooker Chicken Pot Pie


Serves: 4 - 6
Preparation Time: 20 minutes
Cook Time: 3 - 5 hours on High or 6 - 7 on Low


Ingredients
4 chicken breasts, chopped into chunks
1 cup of peeled, chopped carrots (or approx. three medium sized carrots)
1 (326g) can of sweetcorn
1 cup of frozen peas (or fill the empty sweetcorn can with peas to get approx. 1 cup)
1 teaspoon of dried oregano
1 teaspoon of dried thyme
1 teaspoon of celery seed
1 onion, chopped (we prefer red onions)
2 cans of Bachelor's Condensed Cream of Chicken Soup (MUST be condensed)
A couple of tablespoons of milk (to add to the cans of soup and squish around to get the dregs of the soup out as condensed soup is pretty stodgy and sticks to the can)


Directions
1. Preheat slow cooker. Chop up (and peel, where necessary) chicken, carrots and onion.
2. Add chicken to slow cooker, then add all of the vegetables and herbs.


As you can see, we chose to add brussell sprouts to ours.
Also, while the red onion gives the pie a good colour at this stage,
it loses its colour in the cooking process. 
3. Add soup and stir well until everything is covered with the soup. Don't worry of the soup looks thick to begin with, it'll thin out during the cooking process.


Yum. Appetising? Not so much at this stage.


We topped ours with biscuit, which may be unfamiliar to British readers. It's hard to describe, but basically came out as a mixture between scone and bread in this recipe. I used this recipe to make my biscuits topping, but altered it slightly as I found the milk made it too watery. You may choose to top your pie with mashed potatoes or pastry, but I do recommend trying it with biscuit. It's worth the work.


Biscuit Topping Ingredients
2 cups (250g) of plain (all-purpose) flour
1 tablespoon of baking powder
1 tablespoon of white (granulated) sugar
1 teaspoon of salt
1/3 cup (70g) of margarine
3/4 cup (180ml) of milk


Biscuit Topping Directions


1. In a large bowl, whisk together flour, baking powder, sugar and salt.
2. Cut the margarine into the mixture until it resembles coarse meal.
3. Gradually stir in the milk until the dough pulls away from the side of the bowl.


And now, back to our original chicken pot pie instructions...


4. Spread the biscuit dough on top of the pie as best you can, attempting to cover as much of the contents as possible.


I love how a random pea somehow escaped
and made on to the top of the  biscuit topping.


5. Cook on High for 3 - 5 hours or on Low for 6 - 7. Because of the topping, this recipe is impossible to add to or adjust while it's cooking, although I would occasionally lift the lid to check on how the biscuit mixture was cooking and spot some soup bubbling up the sides.


Suggested Variations:

- Add 10 brussell sprouts with the ends chopped off
- Add 1/2 cup of white wine


— Rachel

Wednesday 8 February 2012

Meal-Planning Wednesday - 8th Feb, 2012

Most families make meal-plans or menu-plans at the weekend, or on Mondays. Our day for planning what we're going to eat for the next week depends on our timetable. Last semester, we did our grocery shopping on a Thursday because we both have the afternoon off. (Being students and not owning a car, we have to plan in the 20 minute walk to and from the supermarket). This semester it's Wednesday, for the same reason. So while I'd love to jump in with the various blogs that feature menu-planning topics, I'm totally breaking the rules as everyone else on the planet seems to plan their meals on a Monday!


So, I'm a rule-breaker. I'm also probably one of the few students that makes a specific plan of what meals I'm going to eat every day. When I first came to university I'd outline meals for the week, but not give them specific days. But I've found that planning what I eat on each day means that I do actually eat what I planned, and not go hunting in the freezer for emergency chicken kievs because I'm too lazy to make the last remaining meal on my list. And now that Simon and I cook and budget together, meal planning has been a massive help. Meals that would previously have fed me for four days and still had leftovers now feed us for one meal and maybe enough for one person to eat for lunch the next day. He eats a LOT! So now we cook more meals, or in bigger quantities so that we have more for leftovers. We're starting to freeze leftovers to eat the next week rather than the next day so that we have more variety to our weekly meals. And we're experimenting a lot, thanks to Pinterest and Gojee. 

Typically, we try to have one meal including fish, one vegetarian meal, one chicken dish and something involving red meat. Then we fill the rest in with frozen leftovers, slow cooker experiments and typically more chicken, as it's cheap. We also try to eat vegetables with every meal, particularly those high in soluble fibre because of my dietary restrictions. We tend to avoid most pork for the same reasons.

Here's our meal plan for this week:

Wednesday - Chicken in white wine sauce with rice and steamed carrots
I recently called my mum and asked her for the white wine sauce recipe that I remembered from my childhood. She laughed and told me that it came out of a can! I went searching in Tesco and discovered the very same can hidden away on the bottom shelf, so we've decided to try it. I'll post our results of this experiment later this week, since Simon isn't keen on using jarred sauces, let alone canned ones!

Thursday - Borscht with sour cream and part-baked rolls
This is our "leftover" meal for the week, as we made a large quantity of this last week and froze half of it.

Our vegetarian meal for the week, high in fibre and relatively cheap. We both love chili and sweet potato and it gives me a chance to experiment with our slow cooker more. It also means I can cook in the morning and study in the afternoon, which I prefer.

Saturday is date night and Simon usually cooks. This was his choice, which I approve of as we both love Mexican-inspired food.

We were struggling to come up with an unusual fish recipe for me to cook (normally we have egg fried rice with mackerel or salmon mixed in, which is quick and easy but not very inspiring) and came across this. Looks like I'm using the slow cooker three time this week! But it allows me to get dinner ready before we go to church. We'll probably leave out the shrimp and add some more herbs.

Our red meat meal. Typically we use some sort of mince as it's cheaper but brisket isn't too expensive and we both loved the look of this recipe. We'll serve it with a salad as there's no veggies in the recipe. This is another slow cooker meal, which is perfect as I'm in classes from 2 - 4pm every Monday.

Tuesday - Chrorizo Hash Browns with roasted courgette/zucchini 
We forgot it was Valentine's Day until after we made this menu but this meal looks pretty posh. This is Simon's second choice. There's courgette in another meal so we figured we could use some more for this one, and it uses up the venison chorizo we received as a gift.

Breakfasts - We normally eat cereal for breakfast, except on Saturdays, when I cook something a bit more substantial. This week, Simon has requested scones, which we'll eat with margarine and jam.

Lunch - This is normally a combination of leftovers (if there's not enough for another full meal), noodles or toasties. I want to become more inventive with lunches, though, just without costing us too much extra!

— Rachel

Monday 6 February 2012

Spicy Borscht

Great winter meal; very warming and great with hot rolls. Also very easy to make.

Serves 4 hungry students
Ingredients:
4-5 small beetroots (either pre-cooked, or you can roast them in olive oil, rosemary and thyme)
4 large carrots
3 red onions
4 garlic cloves
1 ltr beef stock
4 sprigs thyme
4 sprigs rosemary
1 tsp sage
Chilli to taste
1 tsp smoked paprika
Sour cream to serve

Method:
Chop the onions and garlic. Heat some oil in a large saucepan and fry the onions and garlic on a medium heat until soft. Dice the beetroot and chop the carrots. Add to the saucepan. Cook for 5 minutes on a medium heat. Add the stock, herbs and spices and stir well. Season with salt and pepper. Cover and simmer for half an hour, or until the carrots are soft. Ladle into bowls and put a dollop of sour cream on top.

— Simon

Friday 3 February 2012

Orange Muffins


If you're not familiar with the University of St. Andrews, you're probably not aware of the tradition of third year students adopting first years as their Academic Children. Simon and I have five children in total (and Simon has an extra son who is technically my Academic Step-Son, but let's not get into the legalities of that...) and this is part of the spread we put on for them at our Raisin Party. 


Fizzy juice, Haribo sweets, sandwiches, Smarties, crisps, muffins,
biscuits and party blowers - what more do you need at a children's party?


The main things you need to know about Raisin Weekend are that the academic mother invites her children to a tea party, then sends them to another location where various academic dads get together to have a party in the evening. Then, the next day, the mother dresses her kids up in ridiculous outfits (mine were bearded fairies) and the father makes them carry an awkward, large object (Simon tied our kids together with a length of plastic we found in our utility cupboard) to the university squad, where all the kids have a foam fight with shaving foam.


But that's not the point of this post. The point is ORANGE MUFFINS. Our kids loved them and they were the only item that we didn't have leftovers of. I used this recipe here, so apologies for the American measurements. But since we only have two mixing bowls in our kitchen and one of them is generally used for serving salad in, it helps to measure things in cups! I'll translate for those Brits reading this blog.


I've made these muffins twice and they're one of my favourite things to bake as they're really easy and I don't think anything can really go wrong with them. A few reviewers on the original website complained that they weren't sweet enough because of the low sugar content but I think the orange juice gives them the perfect sweetness. I used freshly squeezed orange juice so I'm not sure what different juice from a carton would make.


Orange Muffins


Makes: 12, technically. I have one muffin tray and one cupcake tray and the mixture filled both trays perfectly, which makes me think it wouldn't quite make 12 large muffins. So 6 big and 6 small.
Preparation Time: 15 minutes
Cook Time: 25 minutes


Ingredients

2 cups (250g) all-purpose (plain) flour
2 teaspoons baking powder
1/4 teaspoon baking (bicarbonate) soda
1 teaspoon salt
1/2 cup (100g) white (granulated) sugar
1 tablespoon grated orange zest
2/3 cup (160ml) orange juice, preferably freshly squeezed rather than from a carton
1/2 cup (113g) melted butter
2 eggs
1/2 cup (40g) chopped, broken up walnuts
1 tablespoon melted butter
1/4 cup (55g) packed brown sugar
1/2 teaspoon ground cinnamon


Directions

1. Preheat oven. Combine flour, baking powder, baking soda, salt, white sugar and grated orange peel in a bowl. Stir in orange juice, 1/2 cup melted butter, eggs and chopped nuts.


2. Pour into 12 muffin cups.


3. Blend 1 tablespoon melted butter, 1/4 cup brown sugar and 1/2 teaspoon cinnamon. This should make a crumbly mixture suitable for sprinkling on top of each muffin. 


4. Bake in a preheated 350 degrees F (175 degrees C or Gas 4) oven for 20-25 minutes. Serve hot.


Suggested Variations
- Zap one of these in the microwave for 15 seconds then drizzle maple syrup on top and eat for breakfast.


— Rachel

Thursday 2 February 2012

Slow Cooker Taco Soup

I've been intrigued with the idea of Taco Soup ever since I came across this recipe a few months back. As far as I know, this isn't a meal typically served in Britain, even in Mexican restaurants. So when I decided to start using our slow cooker more at the start of this year, I christened this adventure by attempting my very first Taco Soup. 

Stephanie O'Dea's recipe calls for packets of taco seasoning and ranch dressing mix, neither of which you can buy easily in British supermarkets, but thankfully the internet was able to tell me what spices and herbs these packets normally contain. 

To be honest, I should really have started out my slow cooking adventure with a recipe I could follow step by step, but my take on Taco Soup ended up being a massive hit. I made a slightly larger version of this (more mince and sweetcorn) for a group of friends, and a smaller one (only one can of each type of bean) for my parents and brother, as their slow cooker is much smaller than ours. 

Slow Cooker Taco Soup

Serves: 4
Preparation Time: 20 - 30 minutes
Cook Time: 3 - 5 hours on High, or 6 - 7 on Low

Ingredients
The picture above is from the time I added extra
ingredients to feed seven hungry students,
so there's an extra can of corn. Fresh
ingredients not pictured!
2 garlic cloves, chopped
1 onion, chopped
1 red onion, chopped
3 bird's eye chillies, chopped
1 (400g) pack of minced beef
1 teaspoon salt
1 teaspoon pepper
1/2 teaspoon paprika
1 1/2 teaspoon ground cumin
1/4 teaspoon chilli flakes
2 teaspoon dried chives
1/4 teaspoon oregano
1/4 teaspoon dried dill
1 teaspoon celery seed
a few sprigs of fresh parsley, chopped
2 (410g) cans of kidney beans, drained and rinsed
2 (300g) cans of pinto beans, drained and rinsed
2 (400g) cans of chopped tomatoes
1 (326g) can of sweetcorn
1 can of cold water
1 tablespoon balsamic vinegar
1 tablespoon lemon juice

Directions
1. Preheat slow cooker. Fry the chopped garlic, onion and chillies in oil until they start to brown. Add the mince and cook until completely brown. 
2. Add mince mixture to slow cooker. Sprinkle all of the spices and herbs on top of the mince mixture, including salt and pepper.
3. Drain and rinse all of the beans using a sieve and place in the slow cooker. Add the entire contents of the tomato and corn cans. Fill one of the cans with cold tap water and add to mixture. Then add balsamic vinegar and lemon juice.
4. Stir contents of slow cooker until mixed through evenly.
5. Cook for 3 - 5 hours on High or 6 - 7 on Low.
6. Serve topped with grated mozzarella cheese, sour cream, guacamole and tortilla chips. Use the tortilla chips as scoops/spoons and eat with your fingers!

Suggested Variations
- Make this veggie-friendly by not using mince and adding more beans or corn. The beans and sweetcorn make this a fairly substantial meal anyway, so the mince isn't entirely necessary.
- Substitute fresh or dried herbs wherever is easiest for you. We happen to have a parsley plant in our house so that's what we used, but dried parsley would work fine as well.
- If you're not fond of heat, reduce the amount of chillies and chilli flakes used. We're used to hot food in our house and honestly didn't think this had any heat to it, but that's just us. 
- Substitute haricot or cannellini beans if unable to find pinto beans in your local supermarket. Haricot works best as a substitute but cannellini isn't too different. The second time we made this I tried to only buy ingredients at Aldi and Tesco and neither of them stock pinto beans so I had to experiment to see what I could use instead.


— Rachel

Rich Chicken Curry

I always find tomato-based chicken curries far inferior to their lamb counterparts. Lamb, however, is comparatively expensive, so my student curries inevitably consist of some chicken and lots of vegetables. This time, I decided that I would not settle for second place, and would make a tomato-y chicken curry which could rival the rich and deep flavours of its superiors. I made it for a few friends of mine, who ate it all up instantly, so no pictures of the meal. Here's some pretty spices though.

Note from pedantic Rachel: the saffron pictured was used in the rice,
not the curry itself.


Serves 4-5 hungry students
6 Chicken thighs (with bone and skin)
1 Cauliflower
3 Tins of chopped tomatoes (although fresh would be better)
3 Onions
4 Cloves of garlic
1 1/2" Piece of ginger
Chilli peppers to taste (Scotch bonnets go best)
6 Cloves
1 tsp Ground allspice
6 Green cardamom pods
2 tbsp Cumin seeds
2 tbsp Coriander seeds
2 tbsp Tumeric
2 tbsp Garam masala
1 tbsp Paprika
25g Parmesan cheese (honestly)
50g Dark chocolate
Rice to serve

Bone and skin the chicken thighs, keeping the bones and skins for later. Boil 1 litre water. Rub the skins with salt. Heat a small amount of oil in a frying pan, add the skins and adjust heat until the oil is sizzling slightly. Remember to move the skins around in the pan every once in a while. Put the water and bones in a saucepan and bring to the boil. Lower to a simmer and cover.

Chop the onions, garlic, ginger and chillis. Heat some oil in a large heavy-based saucepan. Add the chopped ingredients and the chicken. Stir on a medium-low heat until the chicken is white all over and the onions are soft. Add the tomatoes. Set to a low simmer.

Crush necessary spices and combine them in whatever you have handy. By this point, the chicken skins should be crispy, but not burnt. Remove the skins and set them aside or eating later, or throw them away. Fry the spice mix very quickly in the chicken oil, being careful not to burn them, and add the whole thing to the large saucepan. Season with salt and pepper and stir.

Chop the cauliflower into florets. Take the bones out of the water and add the water to the large saucepan. Add the cauliflower, parmesan and dark chocolate and stir. Leave to simmer (stirring occasionally), uncovered, until the cauliflower is soft and the sauce is thick.

Serve with rice.

— Simon